Editor Interface
Firstly you should become accustomed to the interface of the editor you are going to create maps with.

In the left part of the screen you will see a bar with a set of buttons (this is called the left toolbar). The upper buttons enable you to switch between various editor modes (editing the surface of water, trees etc.).
The  button allows you to deactivate any of these modes. If none of the modes is active, you can control units, attack enemies, construct buildings, etc. in the editor the same as you would in the game. In the lower part of the left toolbar are a set of buttons which allow you to access various menus or switch between the editor modes. In the right part of the screen is a bar with a number of coloured rectangles on it (called the right toolbar). This is where information regarding the editor modes is displayed.
button allows you to deactivate any of these modes. If none of the modes is active, you can control units, attack enemies, construct buildings, etc. in the editor the same as you would in the game. In the lower part of the left toolbar are a set of buttons which allow you to access various menus or switch between the editor modes. In the right part of the screen is a bar with a number of coloured rectangles on it (called the right toolbar). This is where information regarding the editor modes is displayed.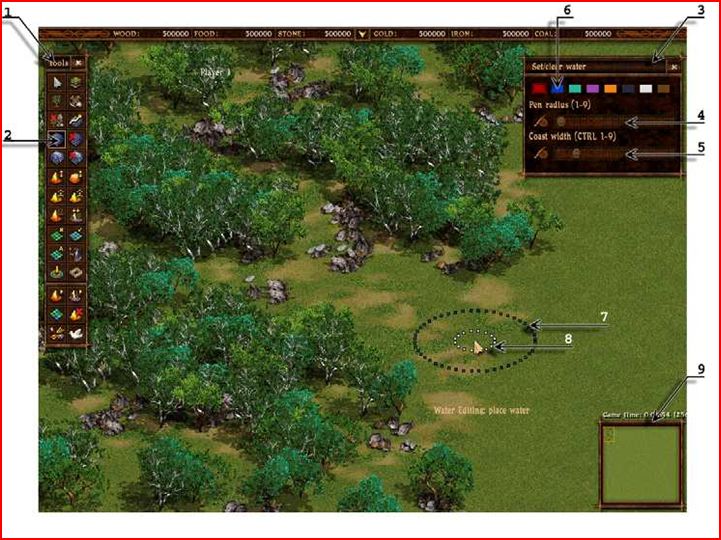
1. Left toolbar
2. Selected mode highlighted by yellow frame
3. Right toolbar
4. Upper scrollbar (defines brush radius in water editing mode)
5. Lower scrollbar (defines coast width in water editing mode)
6. Select nation's colour here
7. Brush radius (indicates the size of the area which will experience changes)
8. Coast width indicator (for water editing mode)
9. Mini-map
Using the F12 key, you can access the Main Menu of the editor, where you can save or load a map, change game settings, or return to the Main Menu of the game.
Pressing F11 will let you take a screenshot, which will be saved as screenX.bmp (where X is the screenshot's number; this will increase if you take several screenshots)
(Verify that your directory has a folder named Screenshots, otherwise create one manually.)
A detailed overview off all quickkeys can be found here : Hotkeys