Water Editing
If you want to change the generated water surfaces or create new reservoirs manually, you can use the water editing buttons.
Clicking on the  button activates the water drawing mode. Two scrollbars will appear in the right toolbar. Using the upper one, you can change the size of the brush, while the lower one allows you to adjust the width of the surface line. Left-click to fill the area under your brush with water. Make sure the area you are filling with water is even and not above the zero line to avoid flooding.
button activates the water drawing mode. Two scrollbars will appear in the right toolbar. Using the upper one, you can change the size of the brush, while the lower one allows you to adjust the width of the surface line. Left-click to fill the area under your brush with water. Make sure the area you are filling with water is even and not above the zero line to avoid flooding. Click on  to remove water. In this mode, the water will be removed from the area under your brush if you left-click with your mouse. Manually created water zones have a somewhat unnatural look due to the absence of sunlight glistening on them. The brightness and size of light spots can be adjusted using the scrollbar in the right toolbar. Left-click on the surface of the water to create a reflection centred on the position your cursor is pointing at. You can delete glints in the water darkening mode, which is activated by clicking on the button. In this mode, a left-click will delete any water glints under the mouse cursor. You can adjust the size of the area darkened with the scrollbar in the right toolbar.
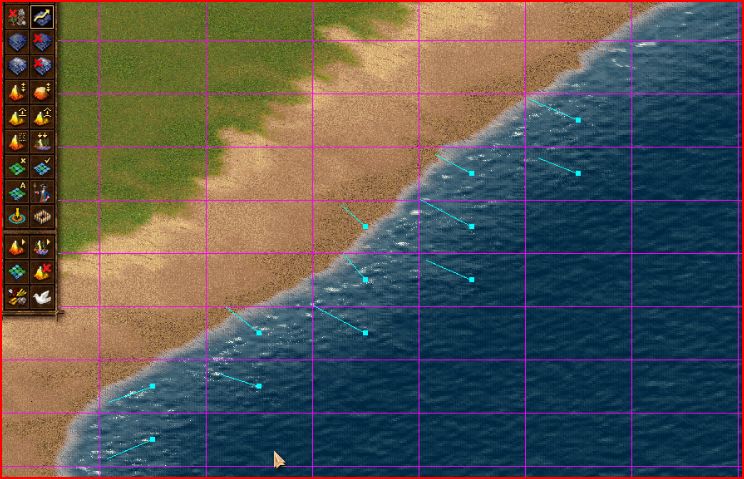
to remove water. In this mode, the water will be removed from the area under your brush if you left-click with your mouse. Manually created water zones have a somewhat unnatural look due to the absence of sunlight glistening on them. The brightness and size of light spots can be adjusted using the scrollbar in the right toolbar. Left-click on the surface of the water to create a reflection centred on the position your cursor is pointing at. You can delete glints in the water darkening mode, which is activated by clicking on the button. In this mode, a left-click will delete any water glints under the mouse cursor. You can adjust the size of the area darkened with the scrollbar in the right toolbar. If you need to create reservoirs or rivers with intensive current, you can use the current editing mode. Click on the  button. You will see lilac grid pop up on the screen. Each section of the grid allows you to specify the direction of the current. Select one of the sections above the water surface and left-click inside it, at the point you want the water to flow towards. An arrow will appear in the middle of the selected section, pointing in the direction you specified. Clicking with the left mouse button lets you move the arrow in any direction. By right-clicking you can delete the current arrow in the section needed.
button. You will see lilac grid pop up on the screen. Each section of the grid allows you to specify the direction of the current. Select one of the sections above the water surface and left-click inside it, at the point you want the water to flow towards. An arrow will appear in the middle of the selected section, pointing in the direction you specified. Clicking with the left mouse button lets you move the arrow in any direction. By right-clicking you can delete the current arrow in the section needed. Note: Currents can be set not only for the sea, but for other water structures as well.