Zones & Groups
Under Construction
Those that have used the Cossacks I & AC editor will be familiar with the Zones & Groups.
They allow for a variety of control over various mission objects when setting up a scenario or battle.
These on their turn can be accessed trough additional menu's giving more set up options for each of the different nodes.
Once set up, they can then be used in one of the various Script editors, depending what you intent to do.
1. Zones
Make sure Scroll lock is on when you click on the button for placing zones in the toolbox.
Move the mouse to the middle of the screen a box will pop up, fill out a fitting name, no longer then 16 characters. Avoid duplicate names.
Hit enter and place your mouse on the map and hold the left mouse down and increase the radius to the desired area.
Once you have placed a zone, you can move it around by selecting the stem. Once selected you can also delete it again by pressing the DEL key on your keyboard.
Additional information can be setup by rightclicking in the zone. A new window will open.
It will state the x & y position of the zone on the map and the Radius size ( R). Obviously you can manually change these values here.
But the most interesting part is the "AdditionalInfo" option.
Hit the <Add...> button. Expand by clicking on the +
Here you can choose between various settings:
It will state the x & y position of the zone on the map and the Radius size ( R). Obviously you can manually change these values here.
But the most interesting part is the "AdditionalInfo" option.
Hit the <Add...> button. Expand by clicking on the +
Here you can choose between various settings:
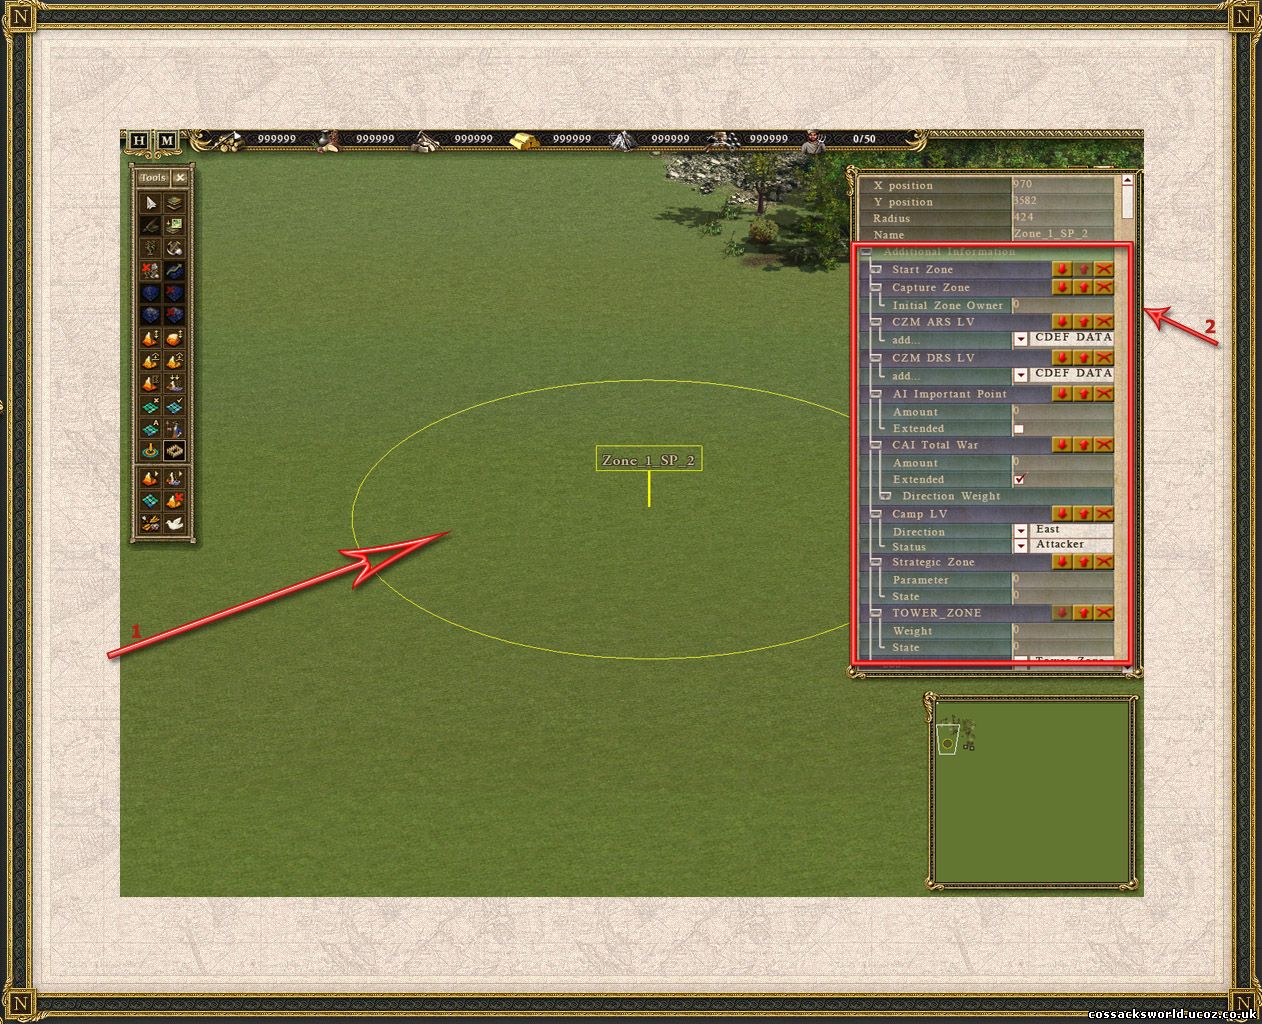
I suggest you only use one of them for each zone and not like I have done on the picture above, that was just to show the different options.
So what is available then?:
-StartPoint: you cannot change anything about this one, it will be used for the 'randomize start positions' which can be found in the Map Options. When you press control ( or was it alt) it will show you white crosses on the map where the start positions are.
- e_CapturableExInfo: Here you can set the owner of the zone. I'm pretty sure this one is used for battles, zone's that have to be captured, or for eg King of the Hill mode. I have to test it out to verify if its indeed this and if it needs additional information from somewhere else.
- CZM_ARS_LV: here you can add another set: CDEF_DATA and in this particular submenu you can choose for :
*m_coverdirs: which are the various directions ( north, east,...)
*m_covertype: can be either :primary, reserve, control or artillery
*m_Direction: here you can fill out a number, im pretty sure it uses a 0-256, rather then 0-360 degrees.
- CZM_DRS_LV: here you can add the set as above : CF_DATA and the submenu's are the same as in the previous one. WHat the exact difference is between either and what they both do , has yet to be investigated.
- AiImportantPoint: here you can add: Amount in numbers and tick the 'extended' box. Set to 100 for a sure attack, set to 0 for no attack, and everything in between depending on your needs.
- CAI_TOTAL_WAR: again you can add amount and extended, but here you also get a 'dir_Weight' options: CAI_ZONE: which gives you on its turn the directions ( north, east,...) again. Now I think here you can setup the 'weight' of a zone, in other words, how important it is to the AI, the higher value, the more likely the AI will defend or attack this zone.
- Camp_LV: again you can set the direction here ( north, east) and the status: attacker or defender. Must be related to scripts again and triggers.
- Strat_ZONE: you can fill out a parameter here , but i dont know exactly what to fill out here. Additionnally you can fill out the 'STATE'.
- TOWER_ZONE: here you can fill out the 'weight' and the 'state'. Mostlikely to denounce a zone for the AI where to build a tower and how likely to build one there ( weight). State is probably 0 or 1.
2. Groups
The difference between zone's and groups is that zones are static and groups can be dynamic. They can include buildings but aswell units.
Groups can also be used to set up settlements ( villages) that are automatically run.
Place a building on the map, any will do.
Check if scroll lock is on.
Select the building, or multiple buildings toghether.
Hit the button Mission Group in the ToolBox, move you mouse to the middle of the map.
Fill out a name for the mission group.
A rectangle will appear stating the group name.
Contrary to mission zone's you can not alter or move these by left clicking on the yellow line.
Adjusting and setting up additional option is done by righclicking in the lower right corner on the yellow line.
If you wish to delete the group, simply hit the X under the 'Units' Menu. Press ESC to exit this menu and the group will be deleted.
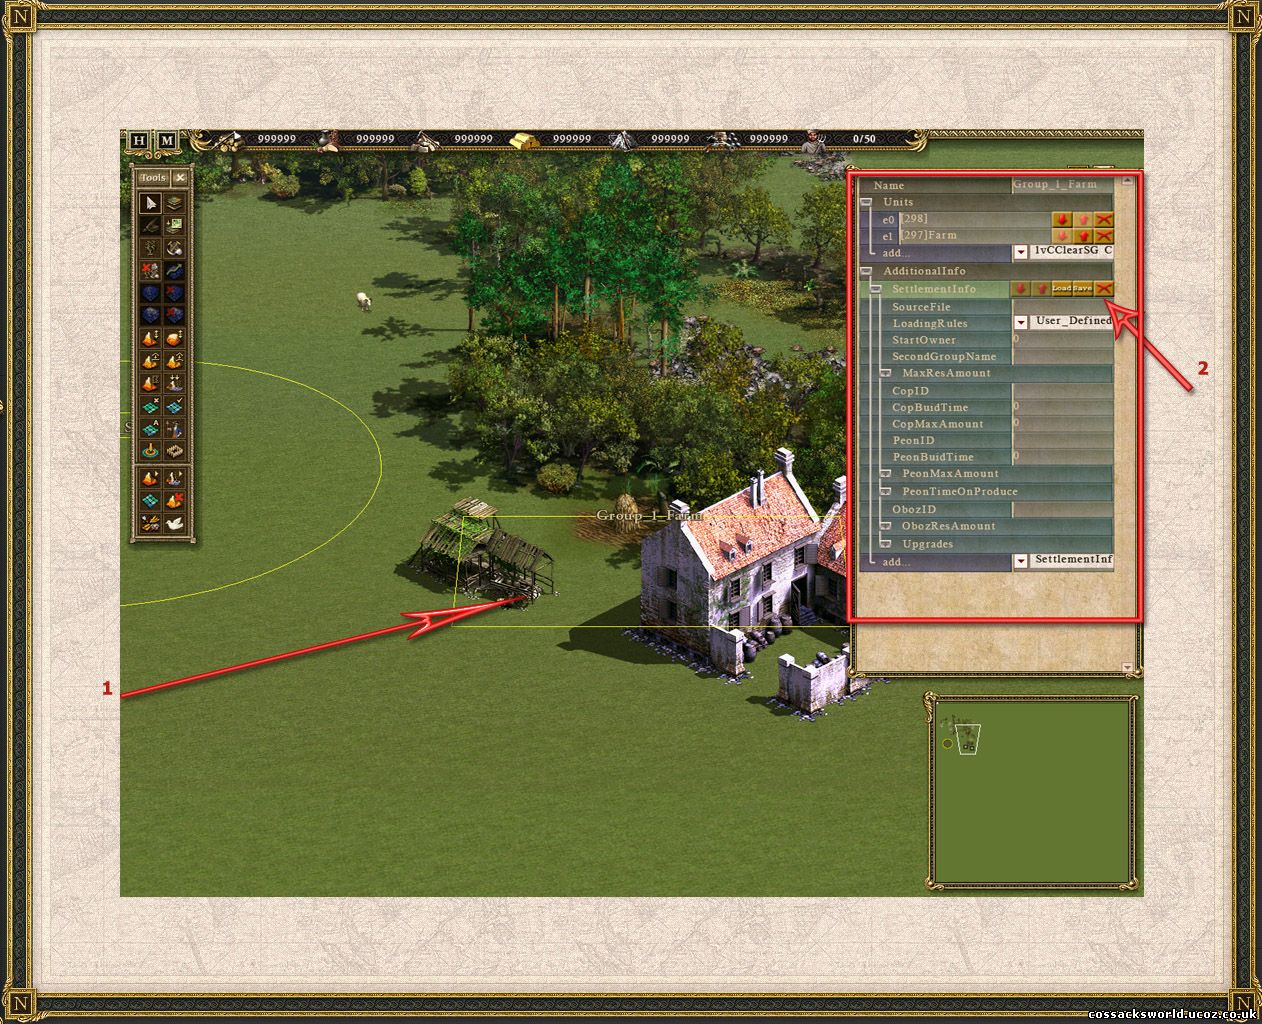
Hit the <Add...>button with 'SettlementInformation'
Expand the menu by clicking the +
Now you can choose to load an already set up xml file so you dont need to worry too much. Click the Load button and choose an appropriate dip.xml file. This is only for Resources ofcourse, eg. mills, mines(coal, iron, gold). It will automatically fill out the necessary settings in the rest of the list to get the icons, upgrades, soldiers, peasants up.
List of available resources dip.xml:
- Coal.dip.xml (coal; for all players and neutral villages)
- CoalNeutral.dip.xml
- FoodN.dip.xml (food; for neutral villages)
- FoodNeutral.dip.xml
- FoodP.dip.xml (food; for all active players)
- Gold.dip.xml (gold; for all players and neutral villages)
- GoldNeutral.dip.xml
- Iron.dip.xml (iron; for all players and neutral villages)
- IronNeutral.dip.xml
- PlayerFood.dip.xml
The icons will only show up on the next loading of the game/map.
A special note about this: if you load and save, it will save the peasants and soldiers that came out of the building aswell, effectively doubling the amount but thats not how you should do it.
If you want more soldiers, peasants to come out of them, use the options discussed below.
After loading a dip.xml file, you can still freely choose to adjust some values. 'Watch out with 'saving' as it will overwrite the original dip.xml file's. Only do this if you are used to using these options, or if you create a new xml file. ( yes ,it will automatically create a new xml file if you hit save, given it has a name, and there are no contradicting settings). Forget xml editing, do it inside the game, you will make less errors that way. I mean why thinking if there is a graphical user interface @ hand. Setting up a map is already enough work.
But you could also have a mission group that has nothing to do with resources but you still would like additional functionality from it.
For example a harbour, a watchtower,a village, a tent, a deserted house, or any building(s) really where you want soldiers to guard and automatically refill after being killed.
Or perhaps if its captured to refill your troops when they are close,...or whatever brilliant idea you come up with.
So here is in short what the different options do:
- LoadingRules: 'user_defined_settings or load_from_source_file'. Makes no real difference, once you have selected the appropriate file, it fills out all needed settings immediately. You could also set up everything manually and save a new "template" in .dip.xml format. Note that you will have to use either one of the text descriptions for the upgrades or add new descriptions in on of the text files.
- StartOwner: 0= player 1, 1= player2,....7= neutral. Now even if you builded a mill for example under the 'red color', changing this number, on next start will change the ownership of the group/building(s).
It is essential, you use ( 7 ~ neutral ) for villages that are to be captured.
- SecondGroupName: on loading FOODP.Dip.xml it will automaticaly fill out a secondary name for the group. The original skirmish maps have a secondary group set up in the primary group ( resource collector & building to drop off). Make sure if your using a secondary building that it has the name of the group on the map.
- MaxResAmount:
- COPID: the name of the soldiers to guard the area as defined in the .NDS files under [MEMBERS] section, second entry.
- COPBUILDTIME: how long it will take to produce on soldier ( in milliseconds )
- COPMAXAMOUNT: how much soldiers it will produce. ( Remember how much soldiers go in a squad, so it has enough to form a squad)
- Peon ID: which peasant it will produce ( usually you can go with UnitKri(FR) )
- PEON Build Time: how long it will take to produce one peasant ( in milliseconds )
- Peon Max Amount: how much peasants it will allocate to a specific resource. This is not the same as how many peasants it will produce, though in practice it will likely be the same.
- Peon Time ON Produce: how long it will take 1 peasant to produce the resource(s).
- ObozID: which mule/packhorse is used to transport the resource's to the closest storehouse/Towncenter.
- OBOZ ResAmount: when it reaches this number ( eg. gold 500), then the packhorse will come out and start transporting the goods to the closest storehouse/towncenter
- Settlement Upgrade: ( note that the first upgrade ( level1 ) comes last in the list. )
* Index: no idea
* DSB_ID: no idea
* IconFile: normally Interf3/Upg
* Icon: which 'number' of icon (level)
* X & Y: not entirely sure ( Probably position in the interface )
* Hint:eg: TXT_UPG3_4; refers to the text files and what will show up on hoovering over the upgrade.
* Duration: how long it will take to do the upgrade
* EffectType: Peasant+ will add extra peasants
* Effect: how much peasants it will allocate to a specific resource
* PriType: Price
* Price: how much the ugprade costs
* isComplete: not sure
* isRun: not sure
* RunTime: ^^
Related Pages : Battle Editor, Map Editing: Villages , Script Editor , Main Be Script Ex